Router Installation
Installation instructions
Step-by-step instructions, descriptions of connections and LED explanations for the various routers and technologies can be found here.
Select your technology
- XGS-PON
- Fiber
- G.FAST
- VDSL
- 5G Receiver
Replaces
Centro Business 3.0 Installation Instructions (XGS-PON) 
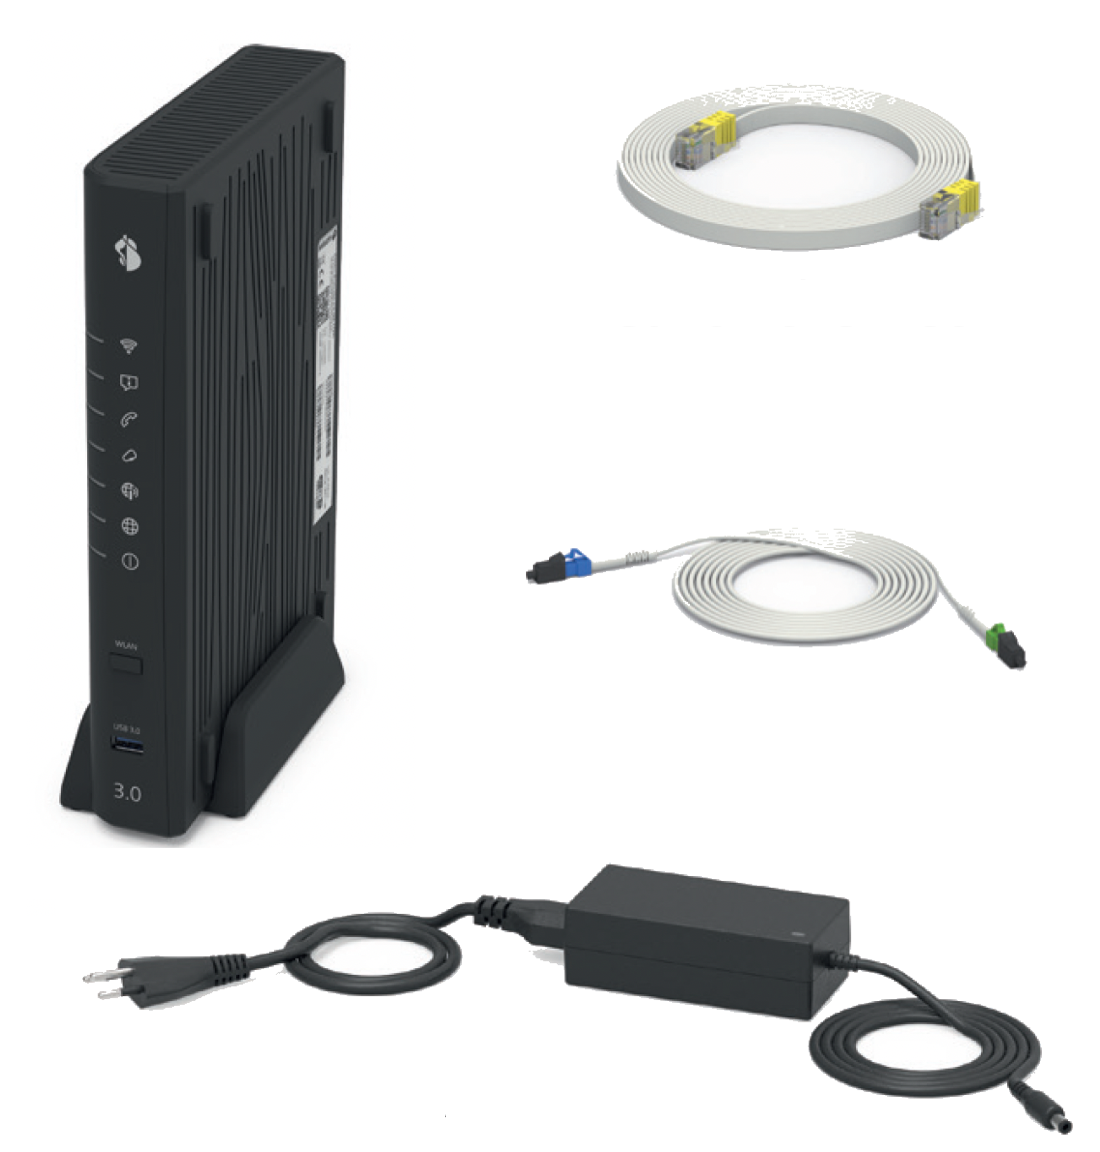
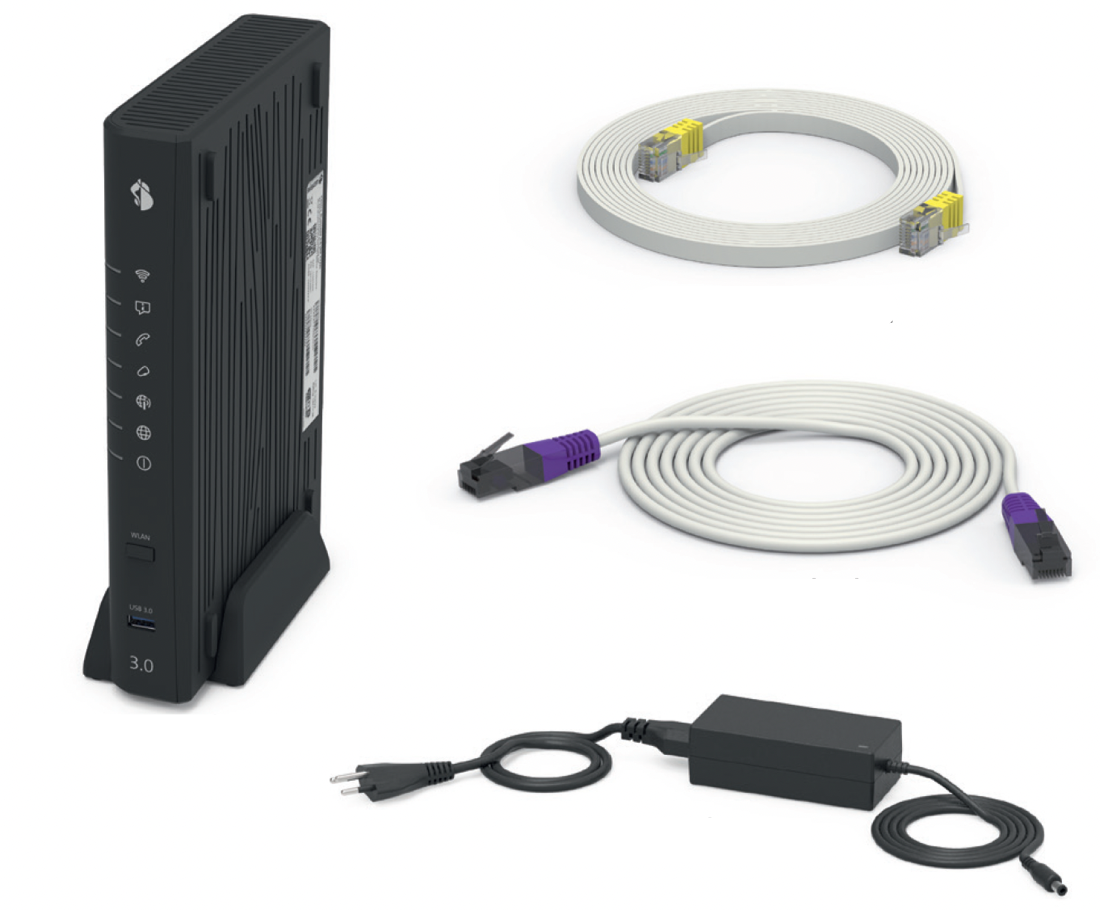
This is what you received:

- Centro Business 3.0 incl. power supply unit and typically a pre-installed XGS-PON SFP module.
- XGS-PON cable 4m
- Ethernet cable 5m
- CB3.0 Quick Guide
- Centro Business 3.0 Safety information and product warnings
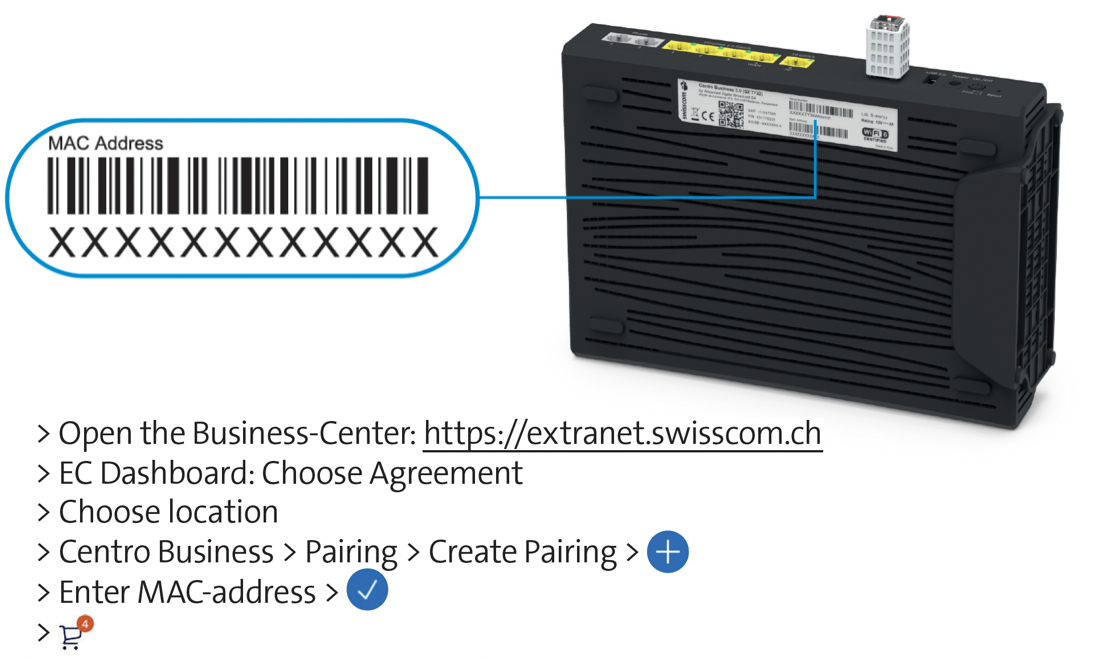
Enterprise Connect customers must first perform MAC pairing:
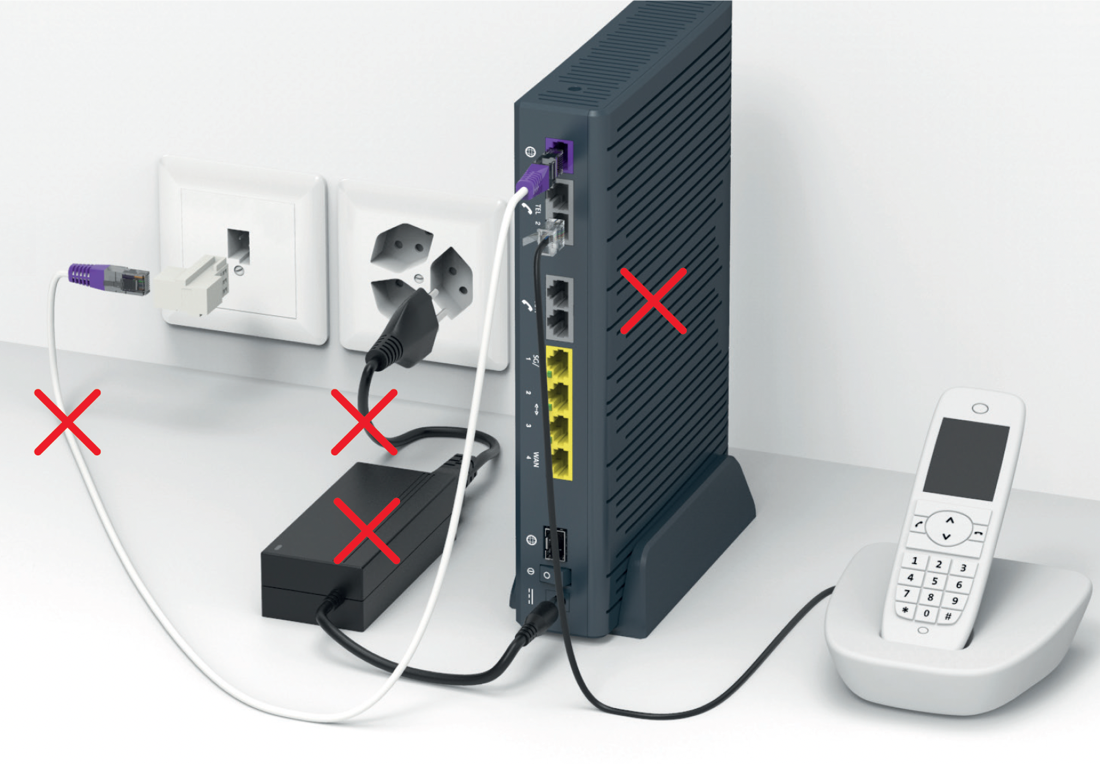
Remove your old internet / telephone installation (if present):
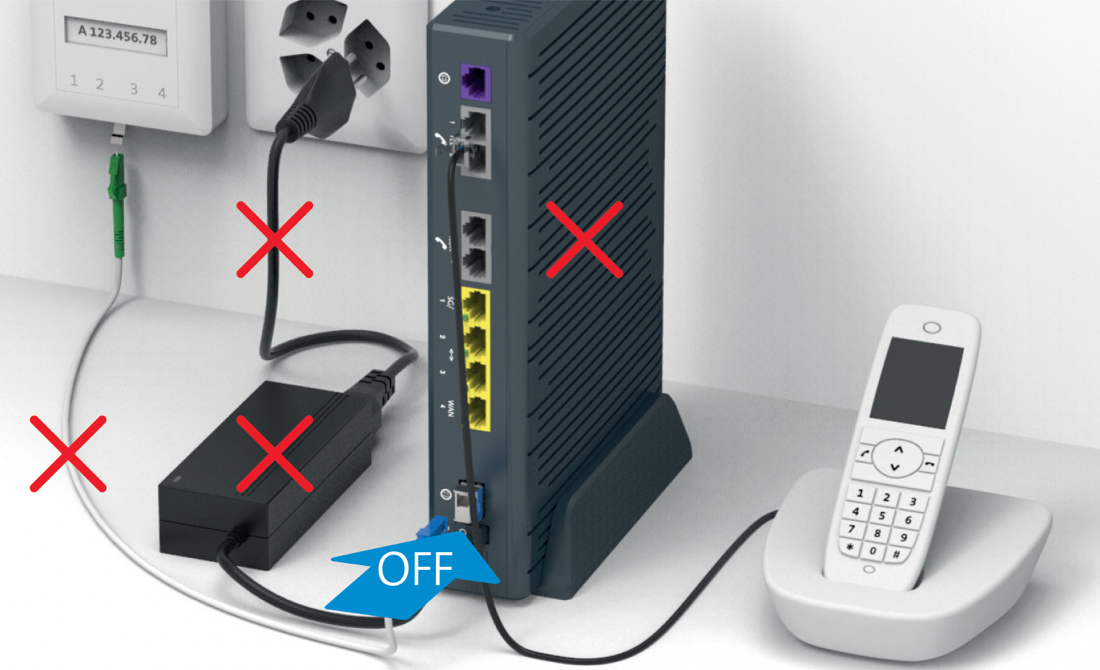 Switch off the existing router, but do not remove it until the fiber optic connection has been successfully commissioned.
Create a current Backup to restore it later on the new Centro Business.
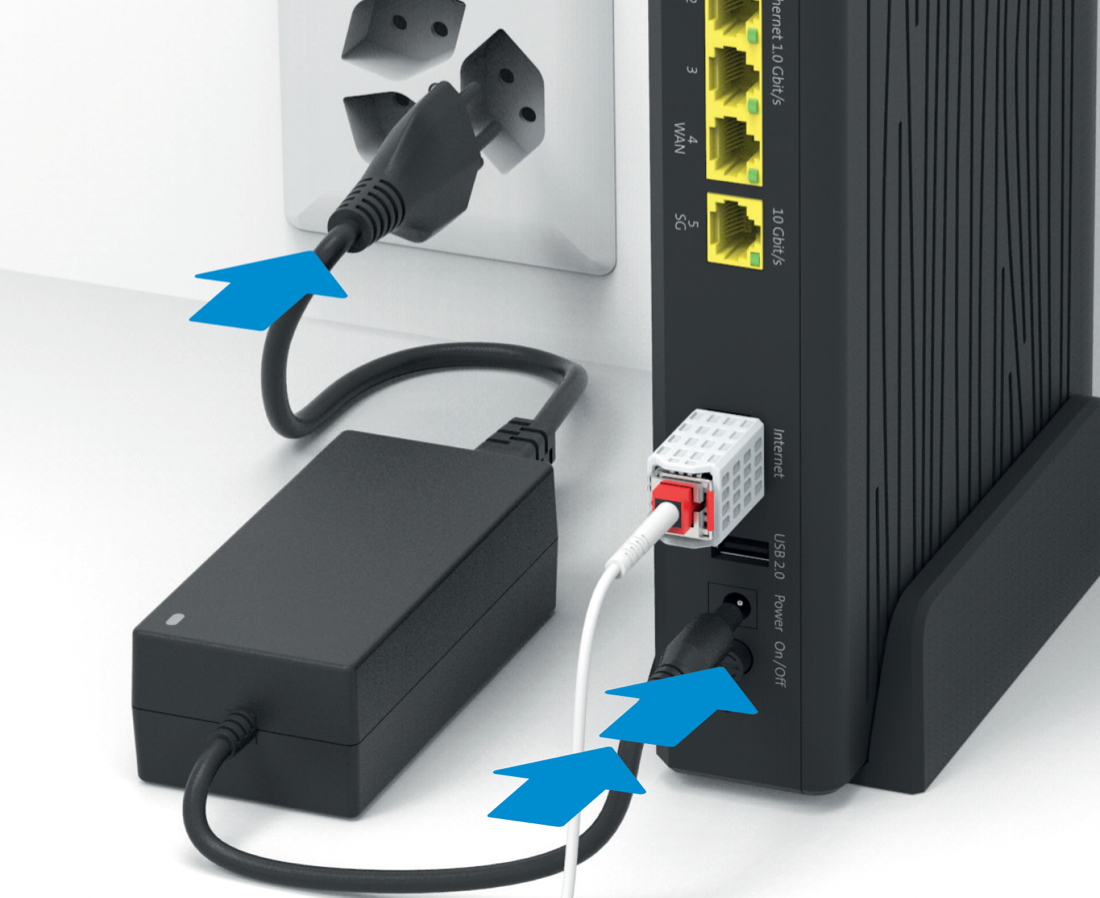
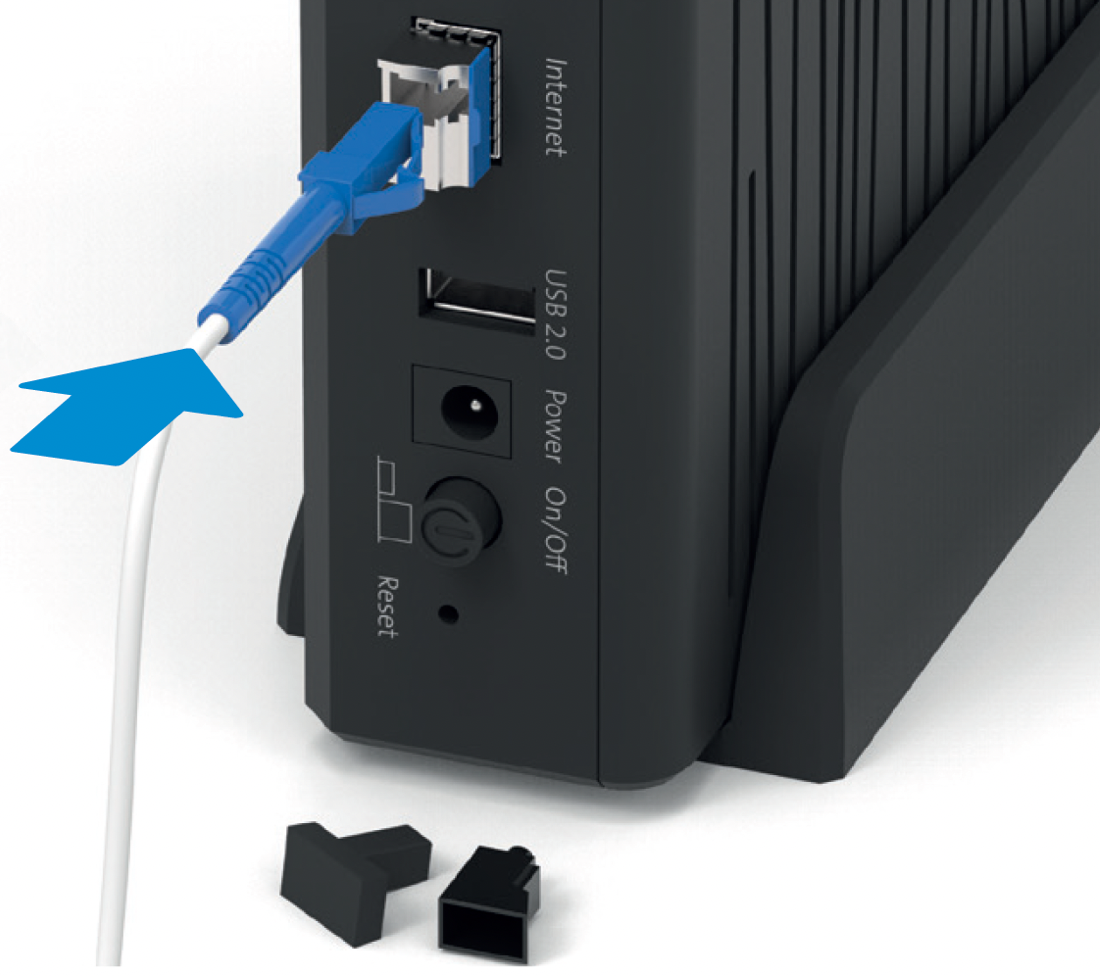
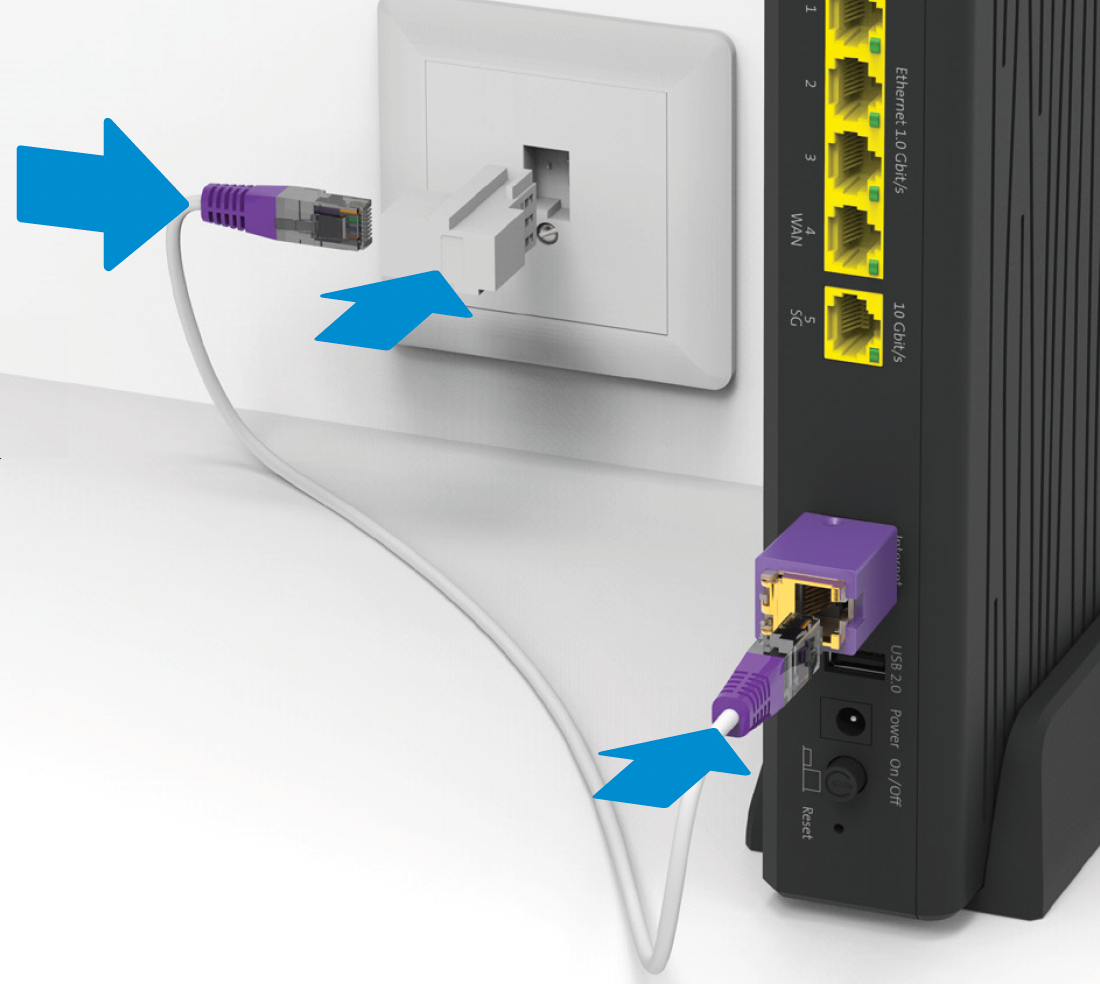
Connect the fiber optic cable to the router:
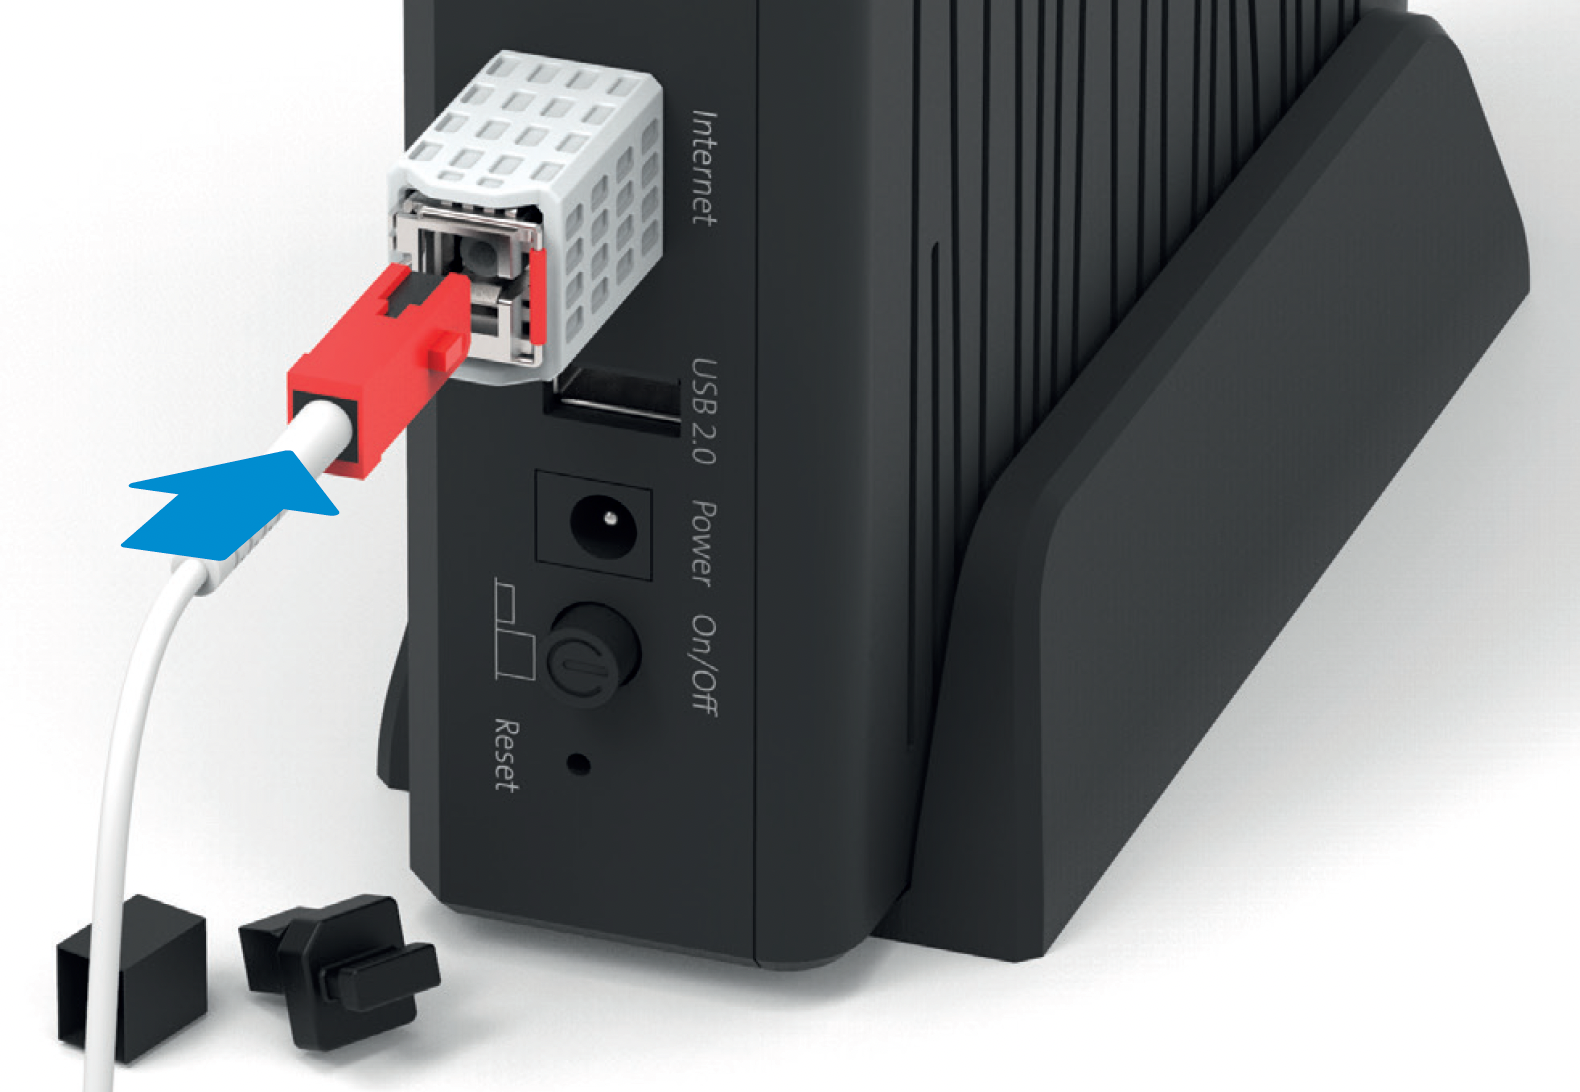 Use the newest supplied fiber optic cable.
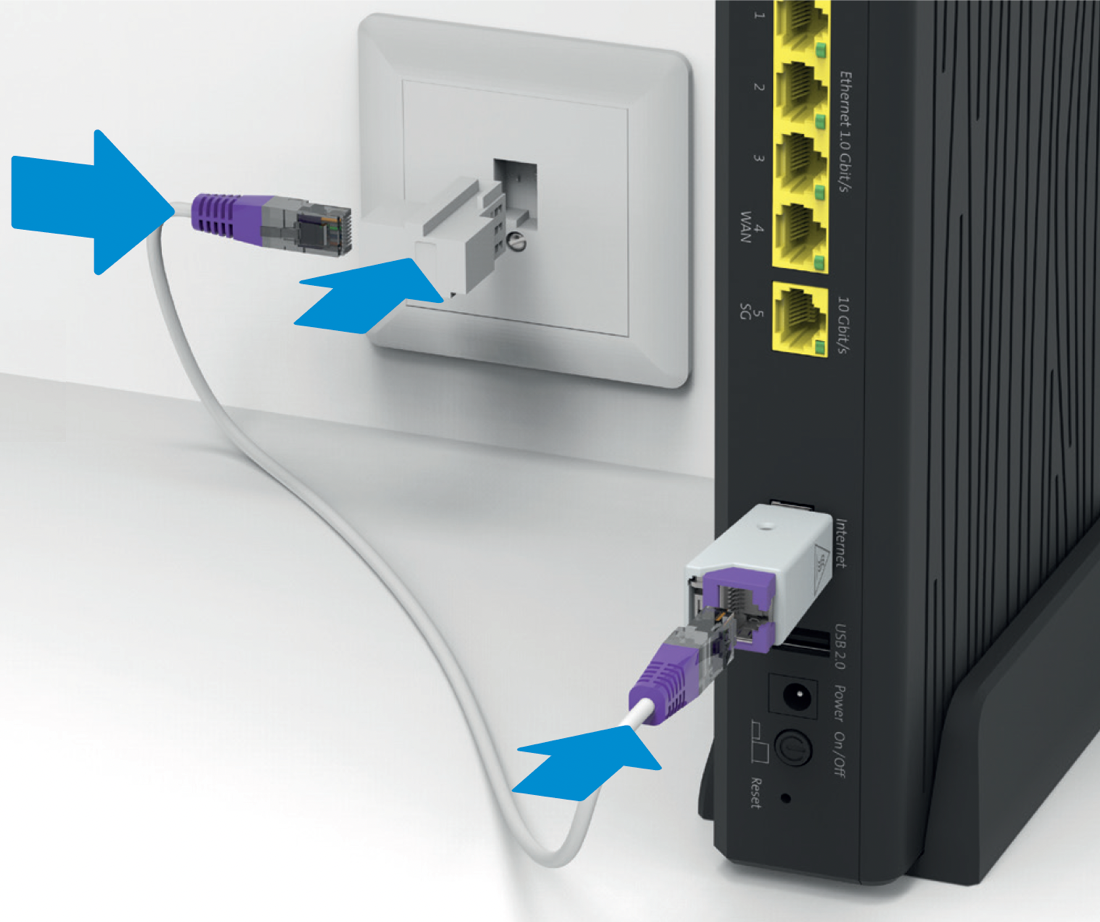
Connect the fiber optic cable to the fiber optic socket:
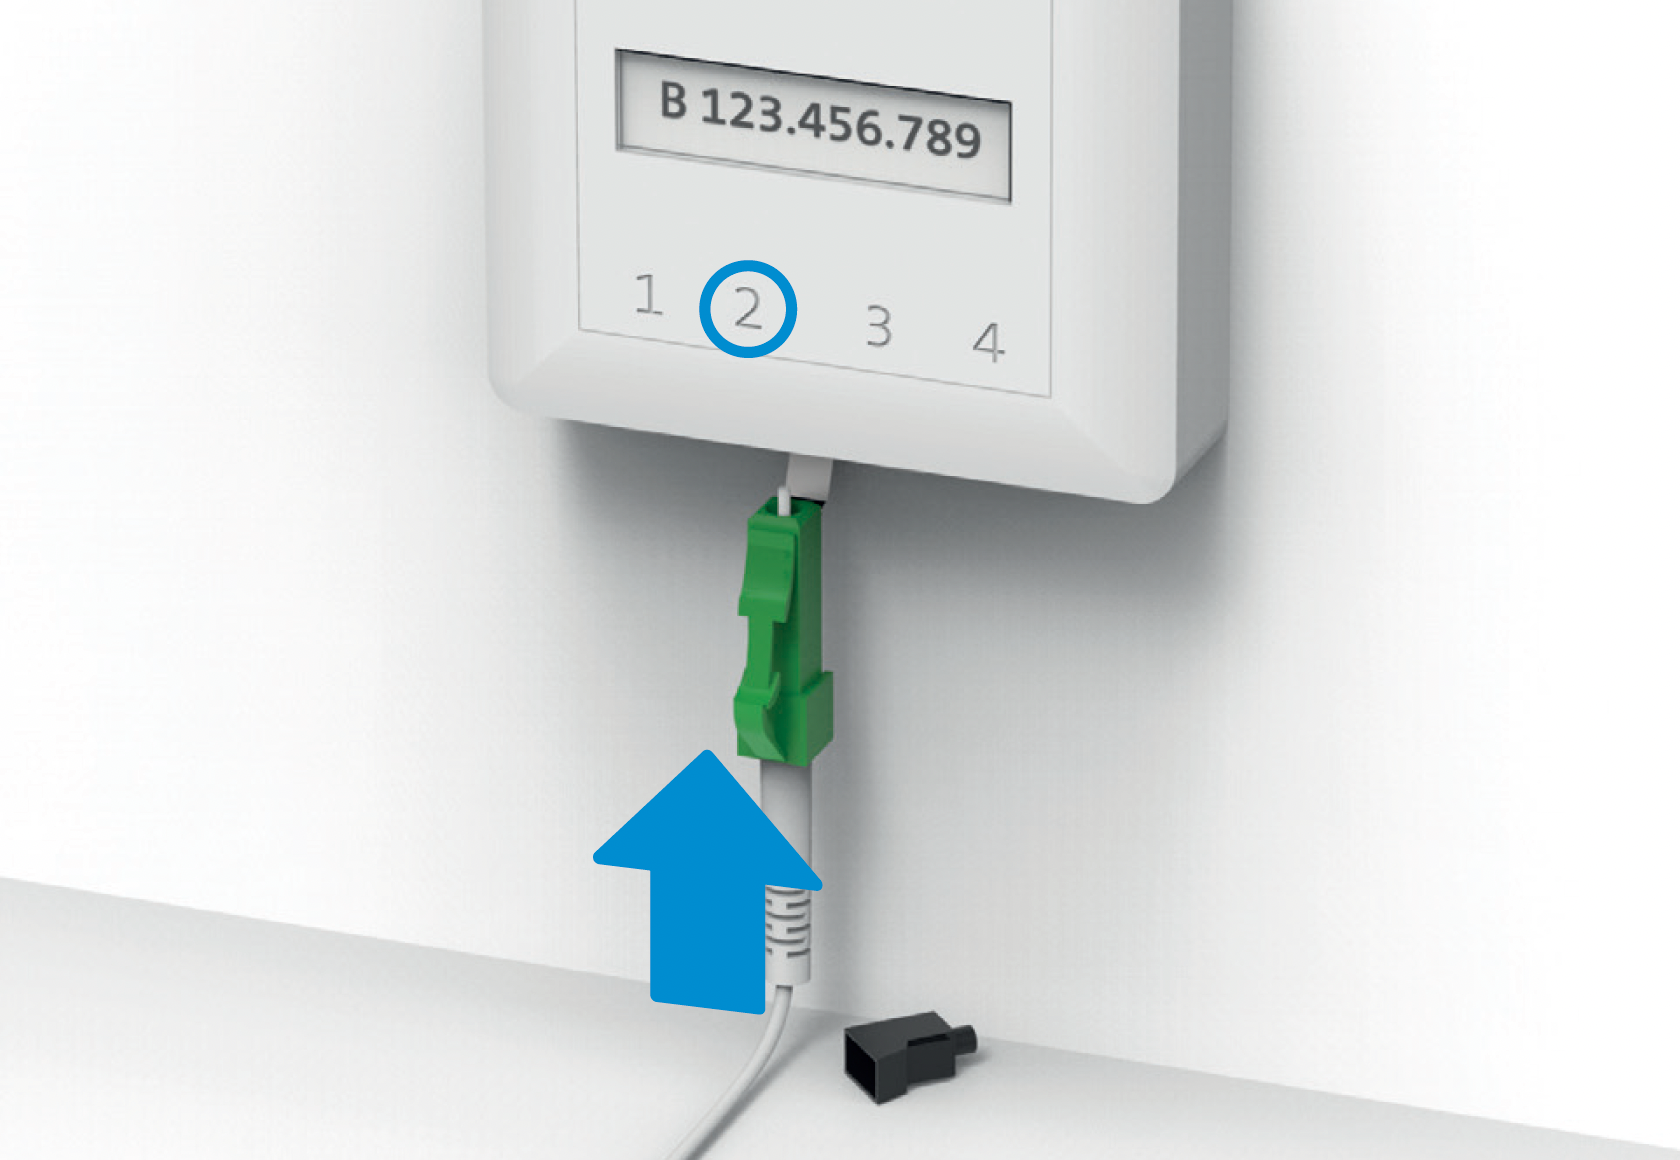 Fiber optic socket (OTO socket): Usually slot no. 2, rarely no. 1
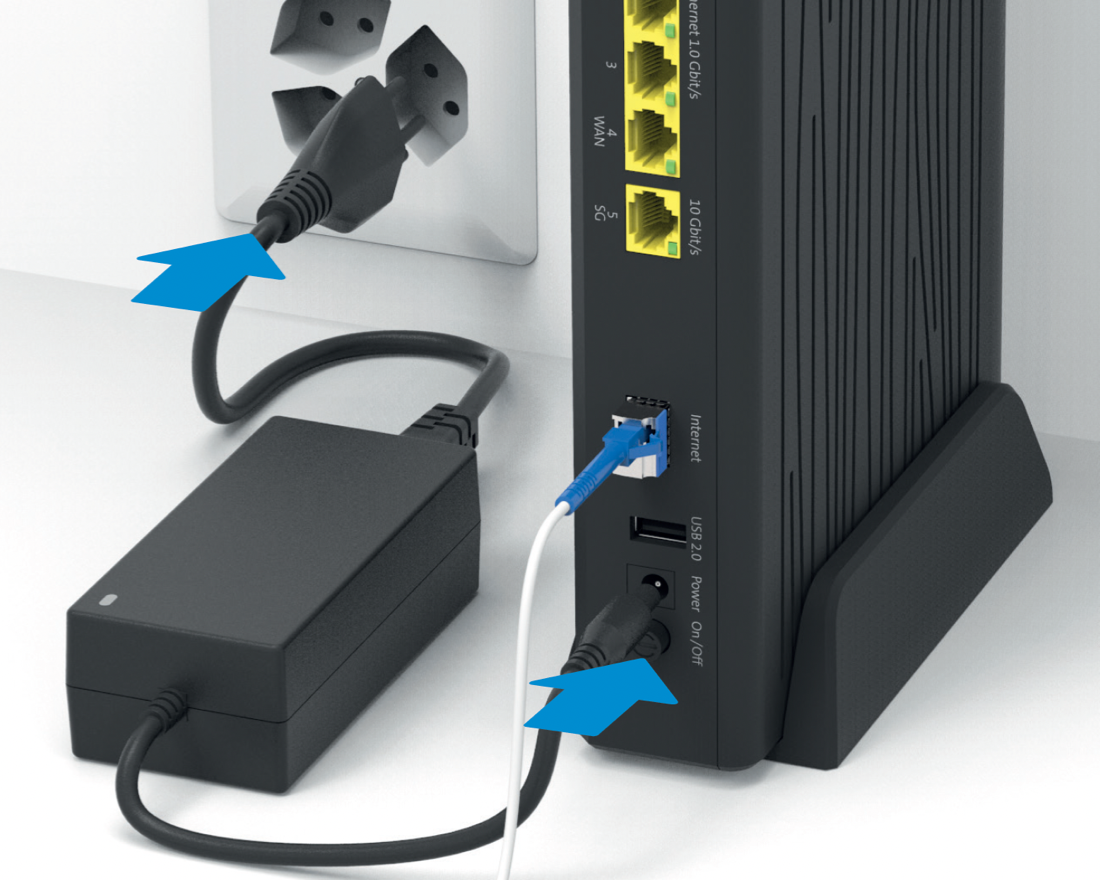
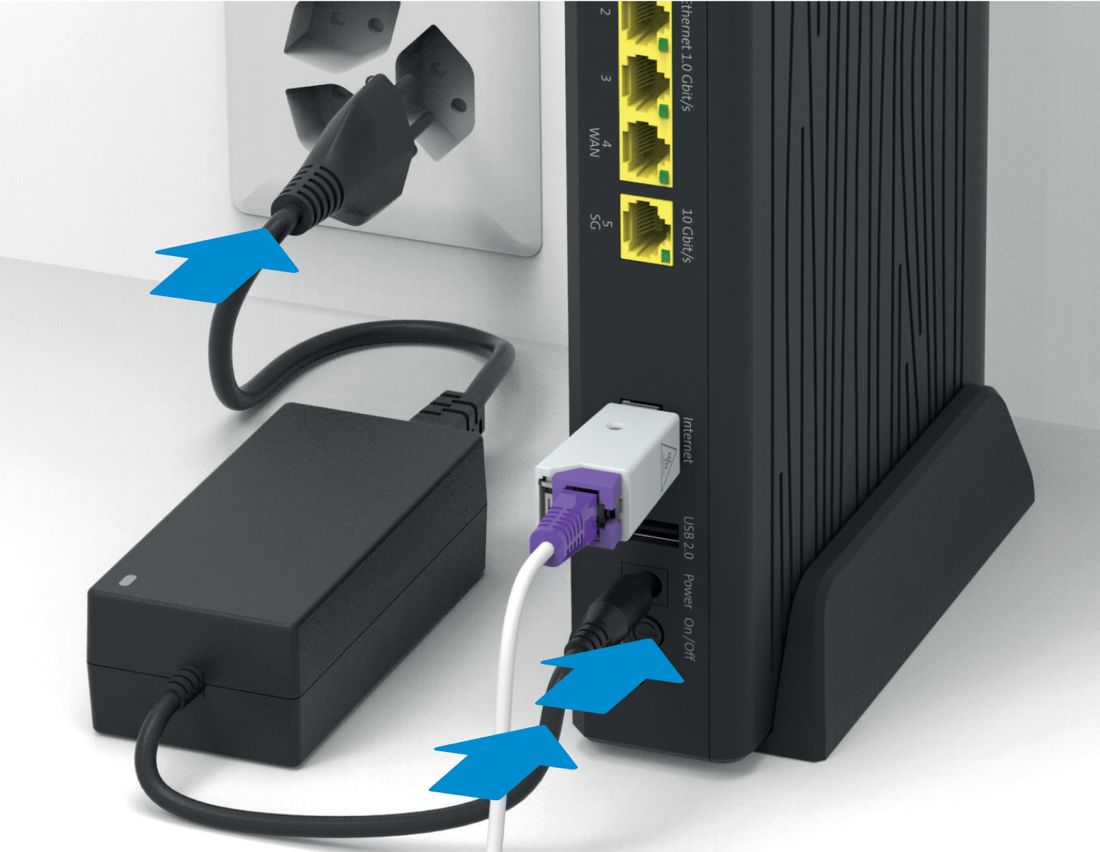
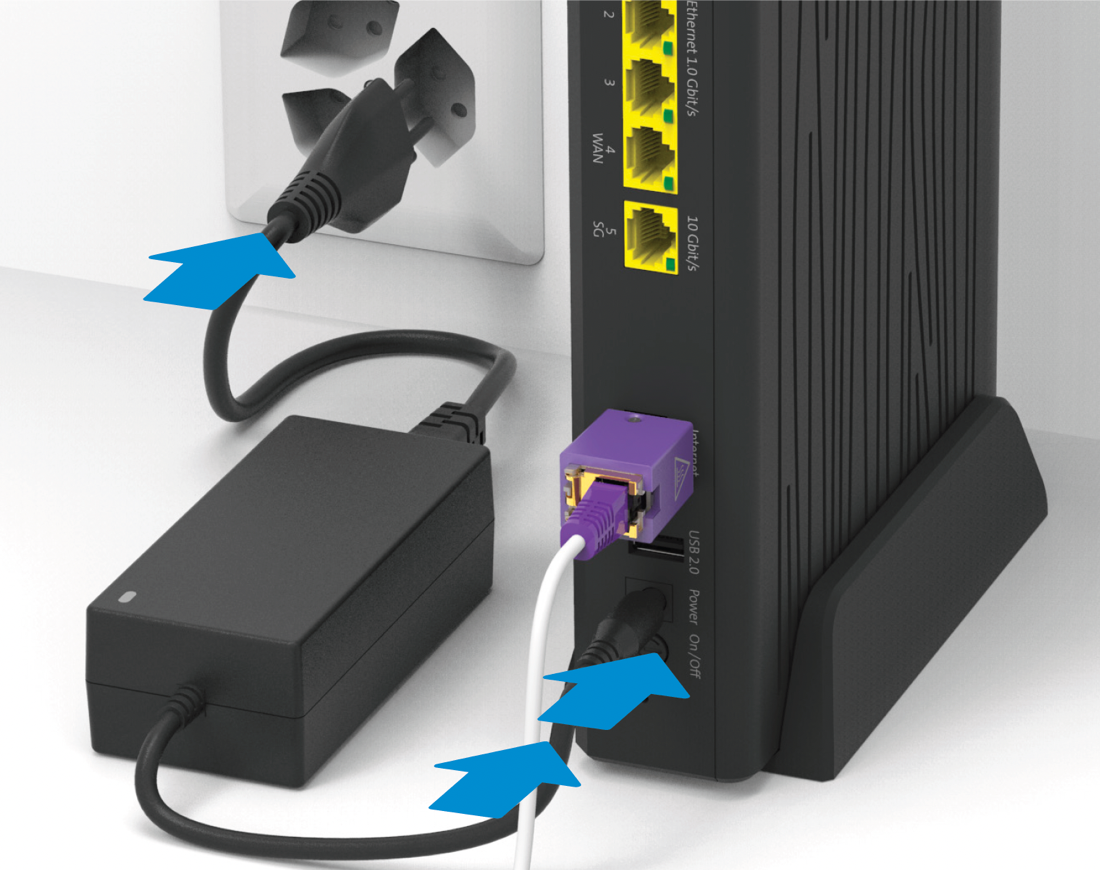
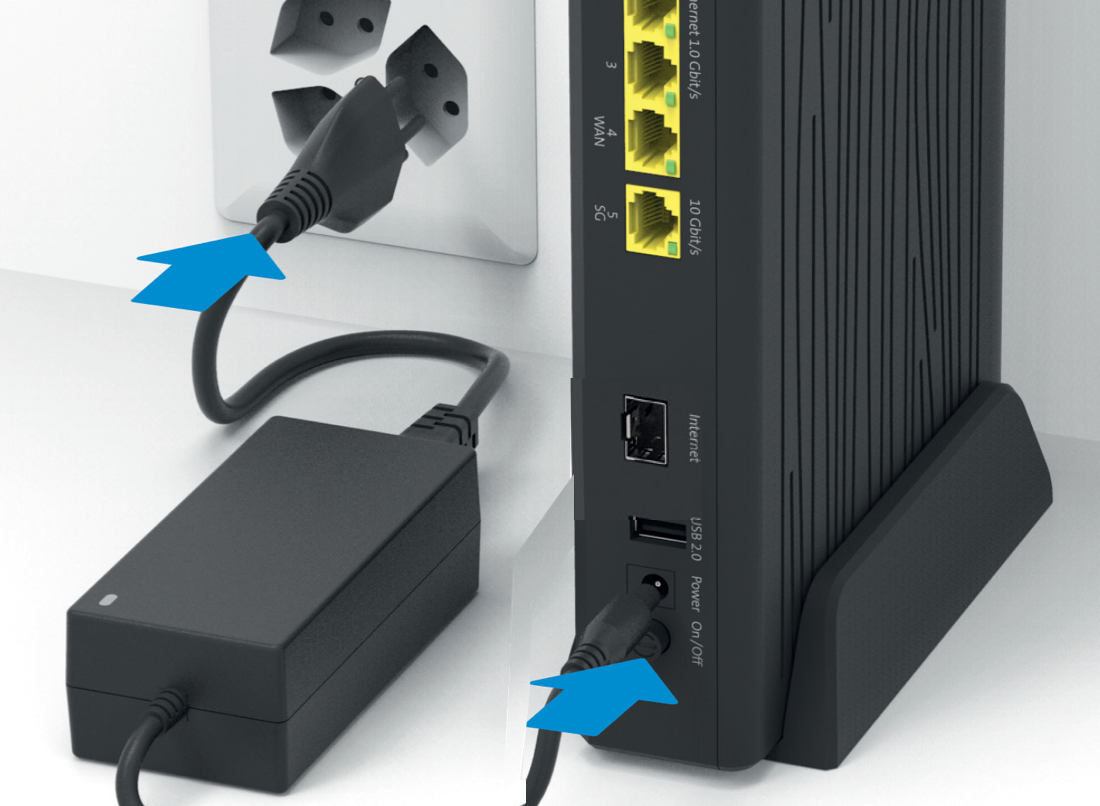
Connect the new power supply unit and switch on the router:
 Fiber optic socket (OTO socket): Usually slot no. 2, rarely no. 1
Wait until the "Power"  LED and "Internet"
  LED glow solid white:
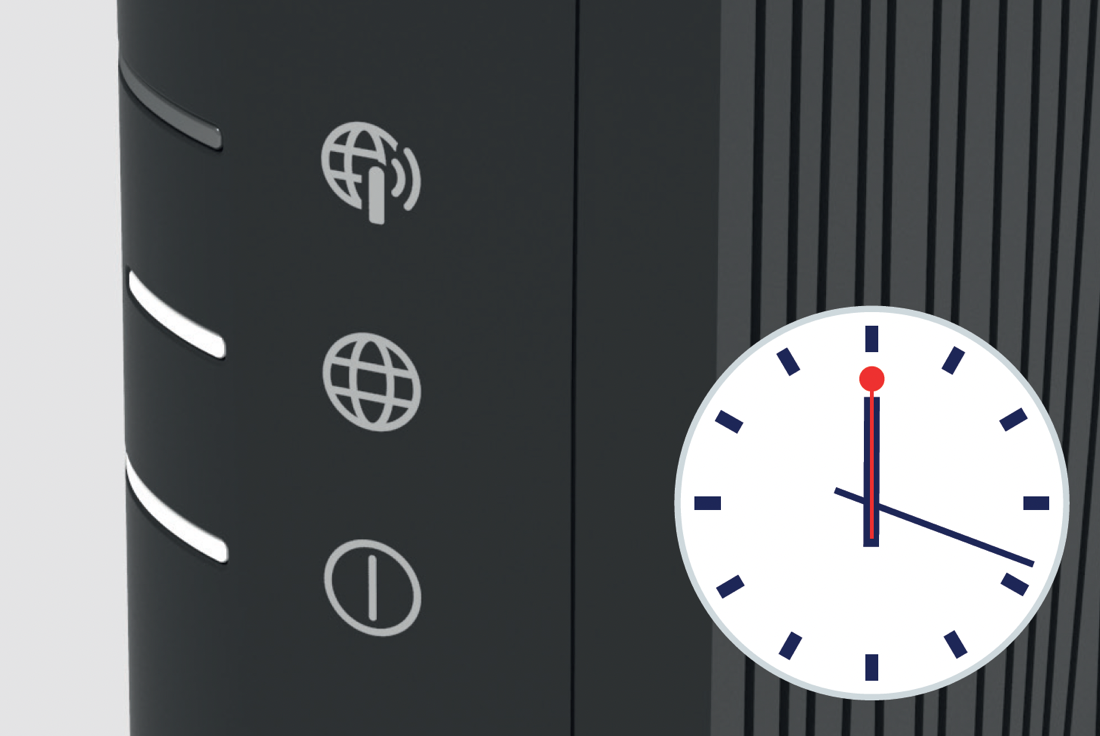
- The router may restart several times during the installation.
- If beamNet is activated on the connection, commissioning can take a good 30 minutes. Please just have a little patience.
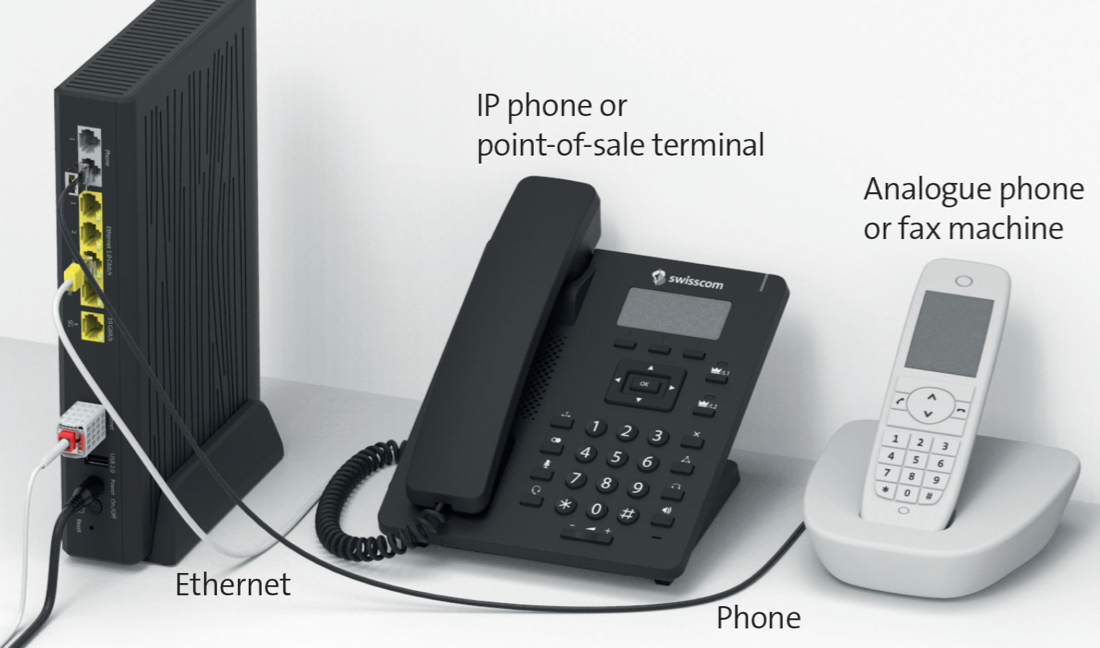
Connect your telephony devices directly to the router:
 If you have subscribed to fixed-line telephony, the service will be activated within 15 minutes and the
 ![]() "Telephony" LED will glow white or green...
"Telephony" LED will glow white or green...
Your internet is now ready:

- For the commissioning of further services and products, use the respective instructions. For example "Internet Failover"
- Send your old device back to Swisscom free of charge for recycling using the enclosed GAS label. Reset the router to factory settings beforehand (Reset).
Replaces Centro Business 3.0 Installation Instructions (Fiber)
This is what you received:
- Centro Business 3.0 incl. power supply unit and typically a pre-installed Fiber SFP module.
- Fiber cable 4m
- Ethernet cable 5m
- CB3.0 Quick Guide
- Centro Business 3.0 Safety information and product warnings
Remove your old internet / telephone installation (if present):
TIP: Create a current Backup to be able to restore it later on the new Centro Business if necessary.
Switch off the existing router, but do not remove it until the fiber optic connection has been successfully commissioned.
Connect the fiber optic cable to the router:
 Use the newest supplied fiber optic cable.
Connect the fiber optic cable to the fiber optic socket:
Fiber optic socket (OTO socket): Usually slot no. 2, rarely no. 1
Connect the new power supply unit and switch on the router:
 Fiber optic socket (OTO socket): Usually slot no. 2, rarely no. 1
Wait until the "Power" LED and "Internet" LED glow solid white:
- The router may restart several times during the installation.
- If beamNet is activated on the connection, commissioning can take a good 30 minutes. Please just have a little patience.
Connect your telephony devices directly to the router:
If you have subscribed to fixed-line telephony, the service will be activated within 15 minutes and the "Telephony" LED will glow white or green....
Your internet is now ready:
- For the commissioning of further services and products, use the respective instructions.
- Send your old device back to Swisscom free of charge for recycling using the enclosed GAS label. Reset the router to factory settings beforehand (Reset).
Replaces Centro Business 3.0 Installation Instructions (G.Fast)
This is what you received:

- Centro Business 3.0 incl. power supply unit and typically a pre-installed G.FAST SFP module.
- Copper cable 4m
- Ethernet cable 5m
- CB3.0 Quick Guide
- Centro Business 3.0 Safety information and product warnings
Remove your old internet / telephone installation (if present):
 TIP: Create a current Backup to be able to restore it later on the new Centro Business if necessary.
Switch off the existing router, but do not remove it until successful commissioning.
Connect the DSL cable:
 Use the newest supplied cable.
Connect the new power supply unit and switch on the router:
Wait until the "Power" LED and "Internet" LED glow solid white:
- The router may restart several times during the installation.
- If beamNet is activated on the connection, commissioning can take a good 30 minutes. Please just have a little patience.
Connect your telephony devices directly to the router:
If you have subscribed to fixed-line telephony, the service will be activated within 15 minutes and the ![]() "Telephony" LED will glow white or green...
"Telephony" LED will glow white or green...
Your internet is now ready:
- For the commissioning of further services and products, use the respective instructions. For example "Internet Failover"
- Send your old device back to Swisscom free of charge for recycling using the enclosed GAS label. Reset the router to factory settings beforehand (Reset).
Replaces Centro Business 3.0 Installation Instructions (VDSL)
This is what you received:
- Centro Business 3.0 incl. power supply unit and typically a pre-installed VDSL SFP module.
- Copper cable 4m
- Ethernet cable 5m
- CB3.0 Quick Guide
- Centro Business 3.0 Safety information and product warnings
Remove your old internet / telephone installation (if present):

TIP: Create a current Backup to be able to restore it later on the new Centro Business if necessary.
Switch off the existing router, but do not remove it until successful commissioning.
Connect the DSL cable:
 Use the newest supplied cable.
Connect the new power supply unit and switch on the router:
Wait until the "Power" LED and "Internet" LED glow solid white:
- The router may restart several times during the installation.
- If beamNet is activated on the connection, commissioning can take a good 30 minutes. Please just have a little patience.
Connect your telephony devices directly to the router:
If you have subscribed to fixed-line telephony, the service will be activated within 15 minutes and the ![]() "Telephony" LED will glow white or green...
"Telephony" LED will glow white or green...
Your internet is now ready:
- For the commissioning of further services and products, use the respective instructions. For example "Internet Failover"
- Send your old device back to Swisscom free of charge for recycling using the enclosed GAS label. Reset the router to factory settings beforehand (Reset).
Detailed installation instructions (PDF) ➜ Centro Business 3.0 Installation Instructions (5G FMR)
This is what you received:
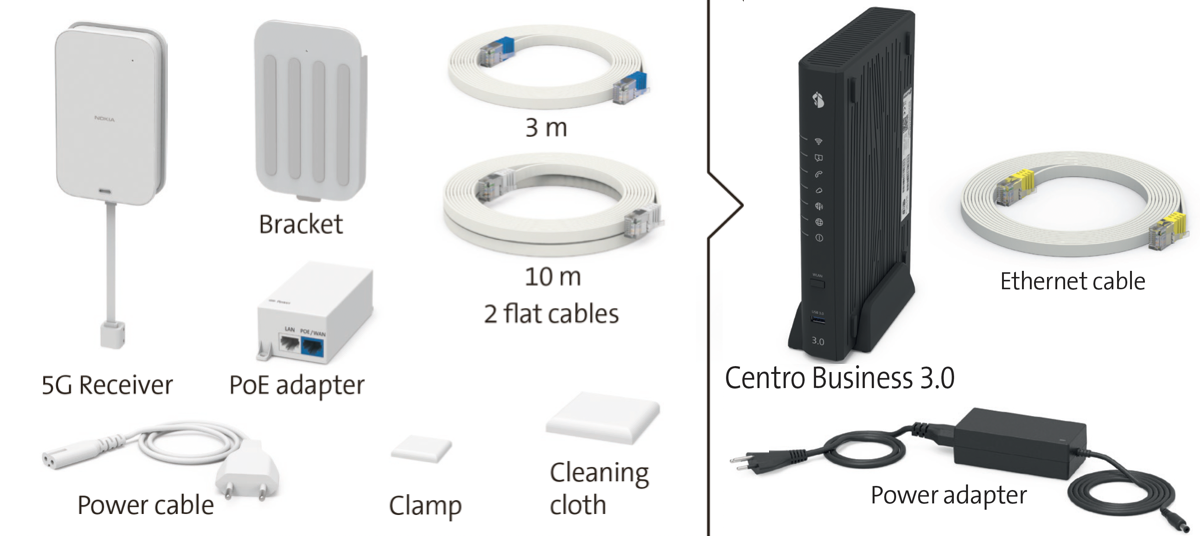
- Centro Business 3.0 incl. power supply unit.
- Copper cable 4m
- Ethernet cable 5m
- CB3.0 Quick Guide
- Centro Business 3.0 Safety information and product warnings
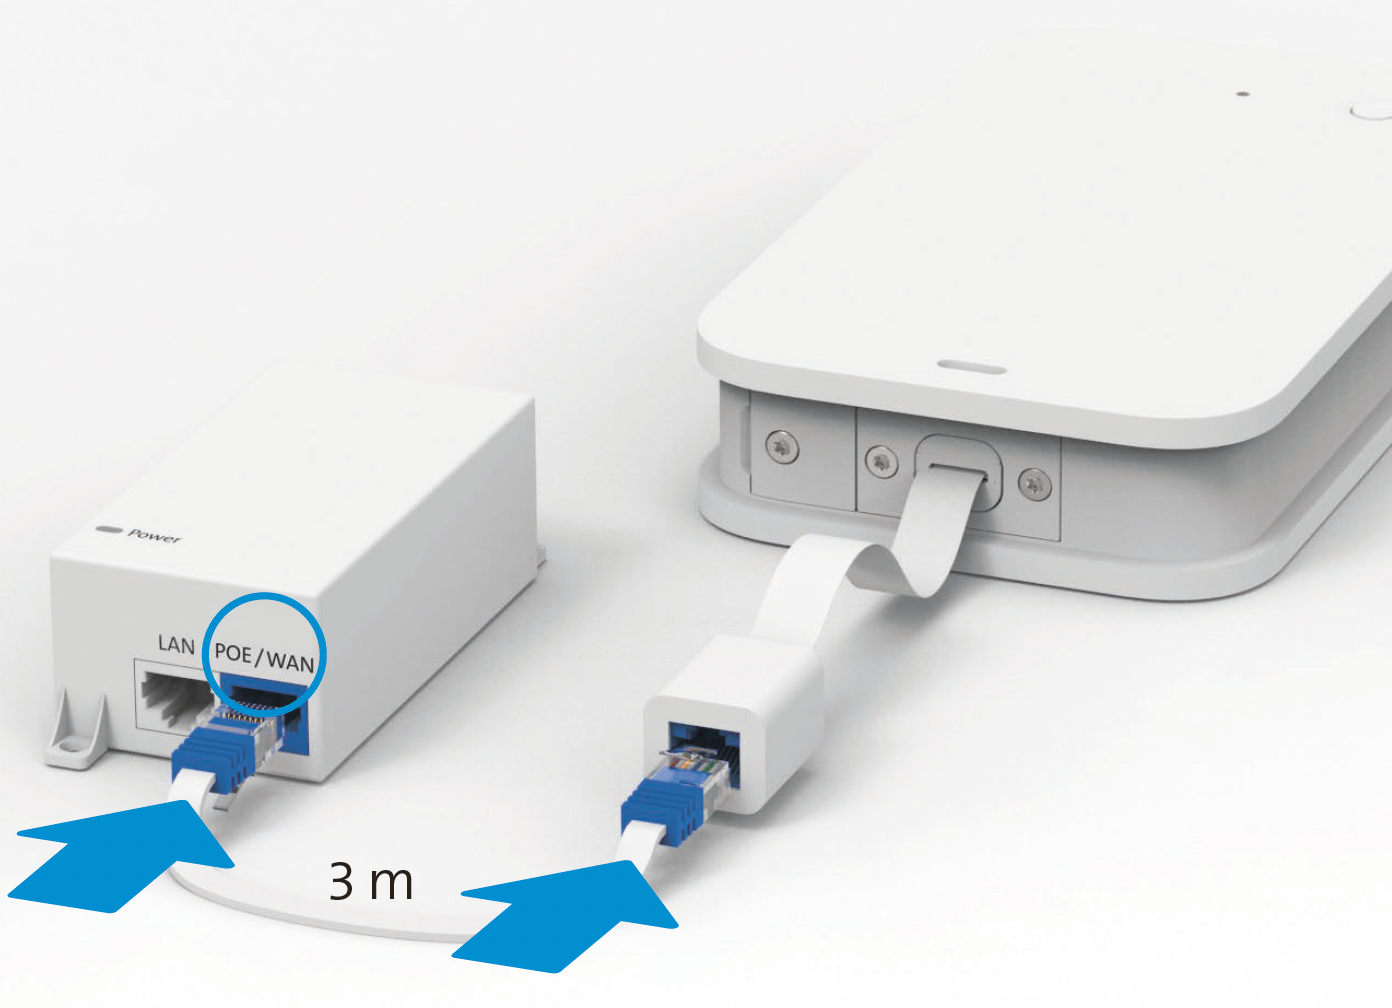
Connect the power supply unit and the 5G Receiver with the 3 meter cable:
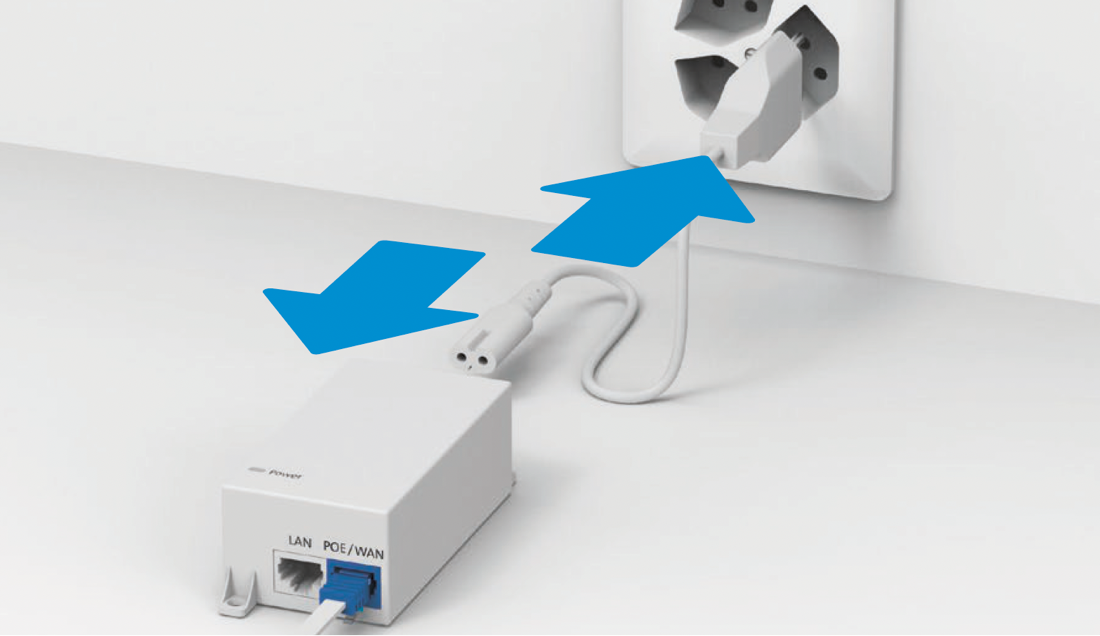
Connect the power supply unit to the power outlet next to a window:
 The 5G Receiver starts and flashes green. When the LED stops flashing, the 5G Receiver is ready. For more details ➜ Centro Business 3.0 Installation Instructions (5G FMR)
Determine the ideal positioning and prepare the bracket and mounting:
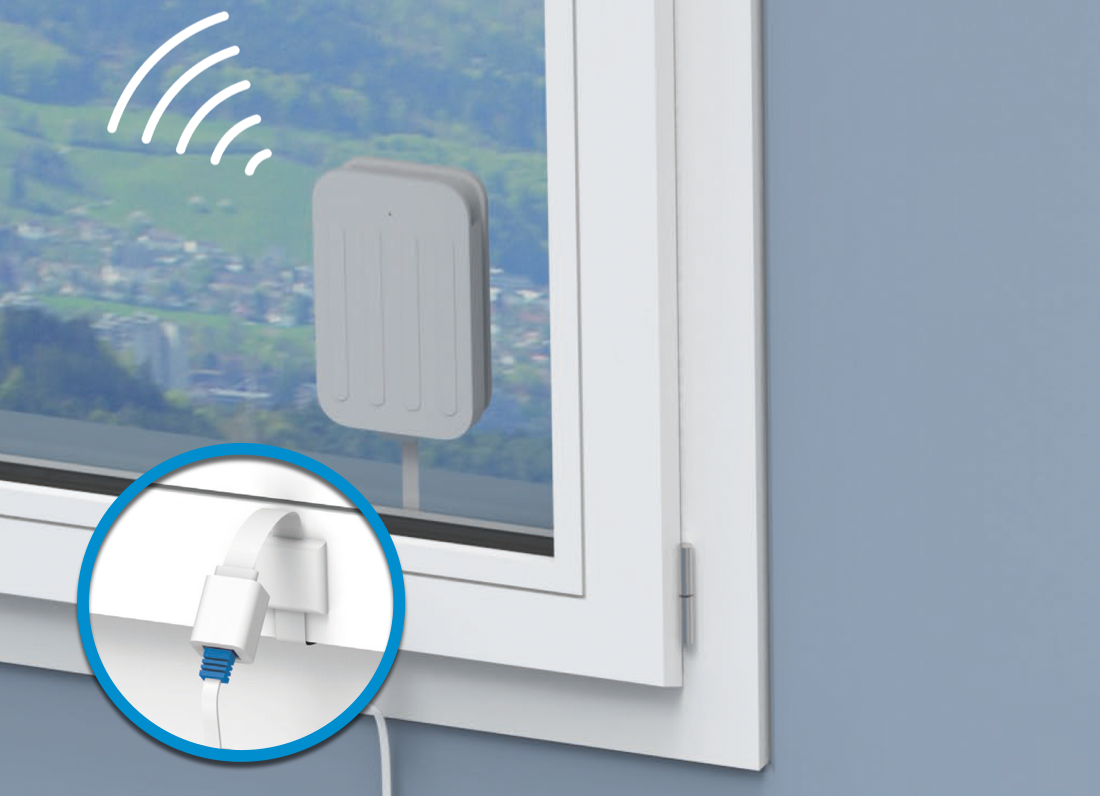
- Mount the 5G Receiver on the outside of the window for optimal reception!
- Route the cable under the window and secure it to the frame with the clip.
- Please preferably select a glass balcony door (no sliding door). If this is not possible, ensure that the selected window for the installation of the 5G Receiver is not located above an area accessible to people / pedestrians.
- For more details ➜ Centro Business 3.0 Installation Instructions (5G FMR)
Connect the power supply unit and switch on the router:
Connect the router (Port 4) and the 5G Receiver power supply unit (POE/WAN):
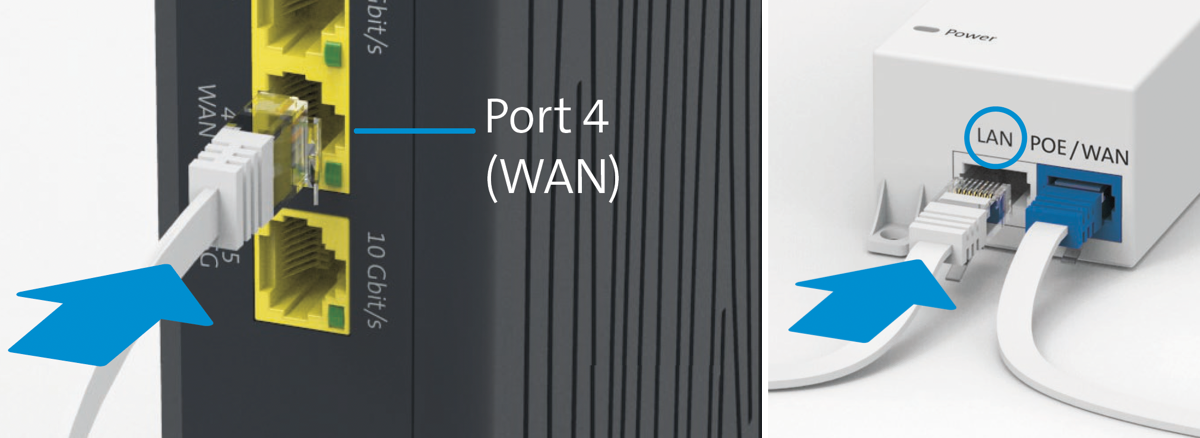 Check the connection using the green
 ![]() LED on the Centro Business 3.0.
LED on the Centro Business 3.0.
Your internet is now ready:
- For the commissioning of further services and products, use the respective instructions.
FAQ – Router Installation
What do I do with unneeded material?
Please return unneeded material such as routers, SFP modules or power supply units so that it can be reused in the spirit of sustainability! www.swisscom.ch/retour
Can I restore a complex router configuration after a new setup?
Yes, find out more in the chapter Backup and Restore
What are the mounting options for the Centro Business?
Freestanding or lying flat (Optimal)
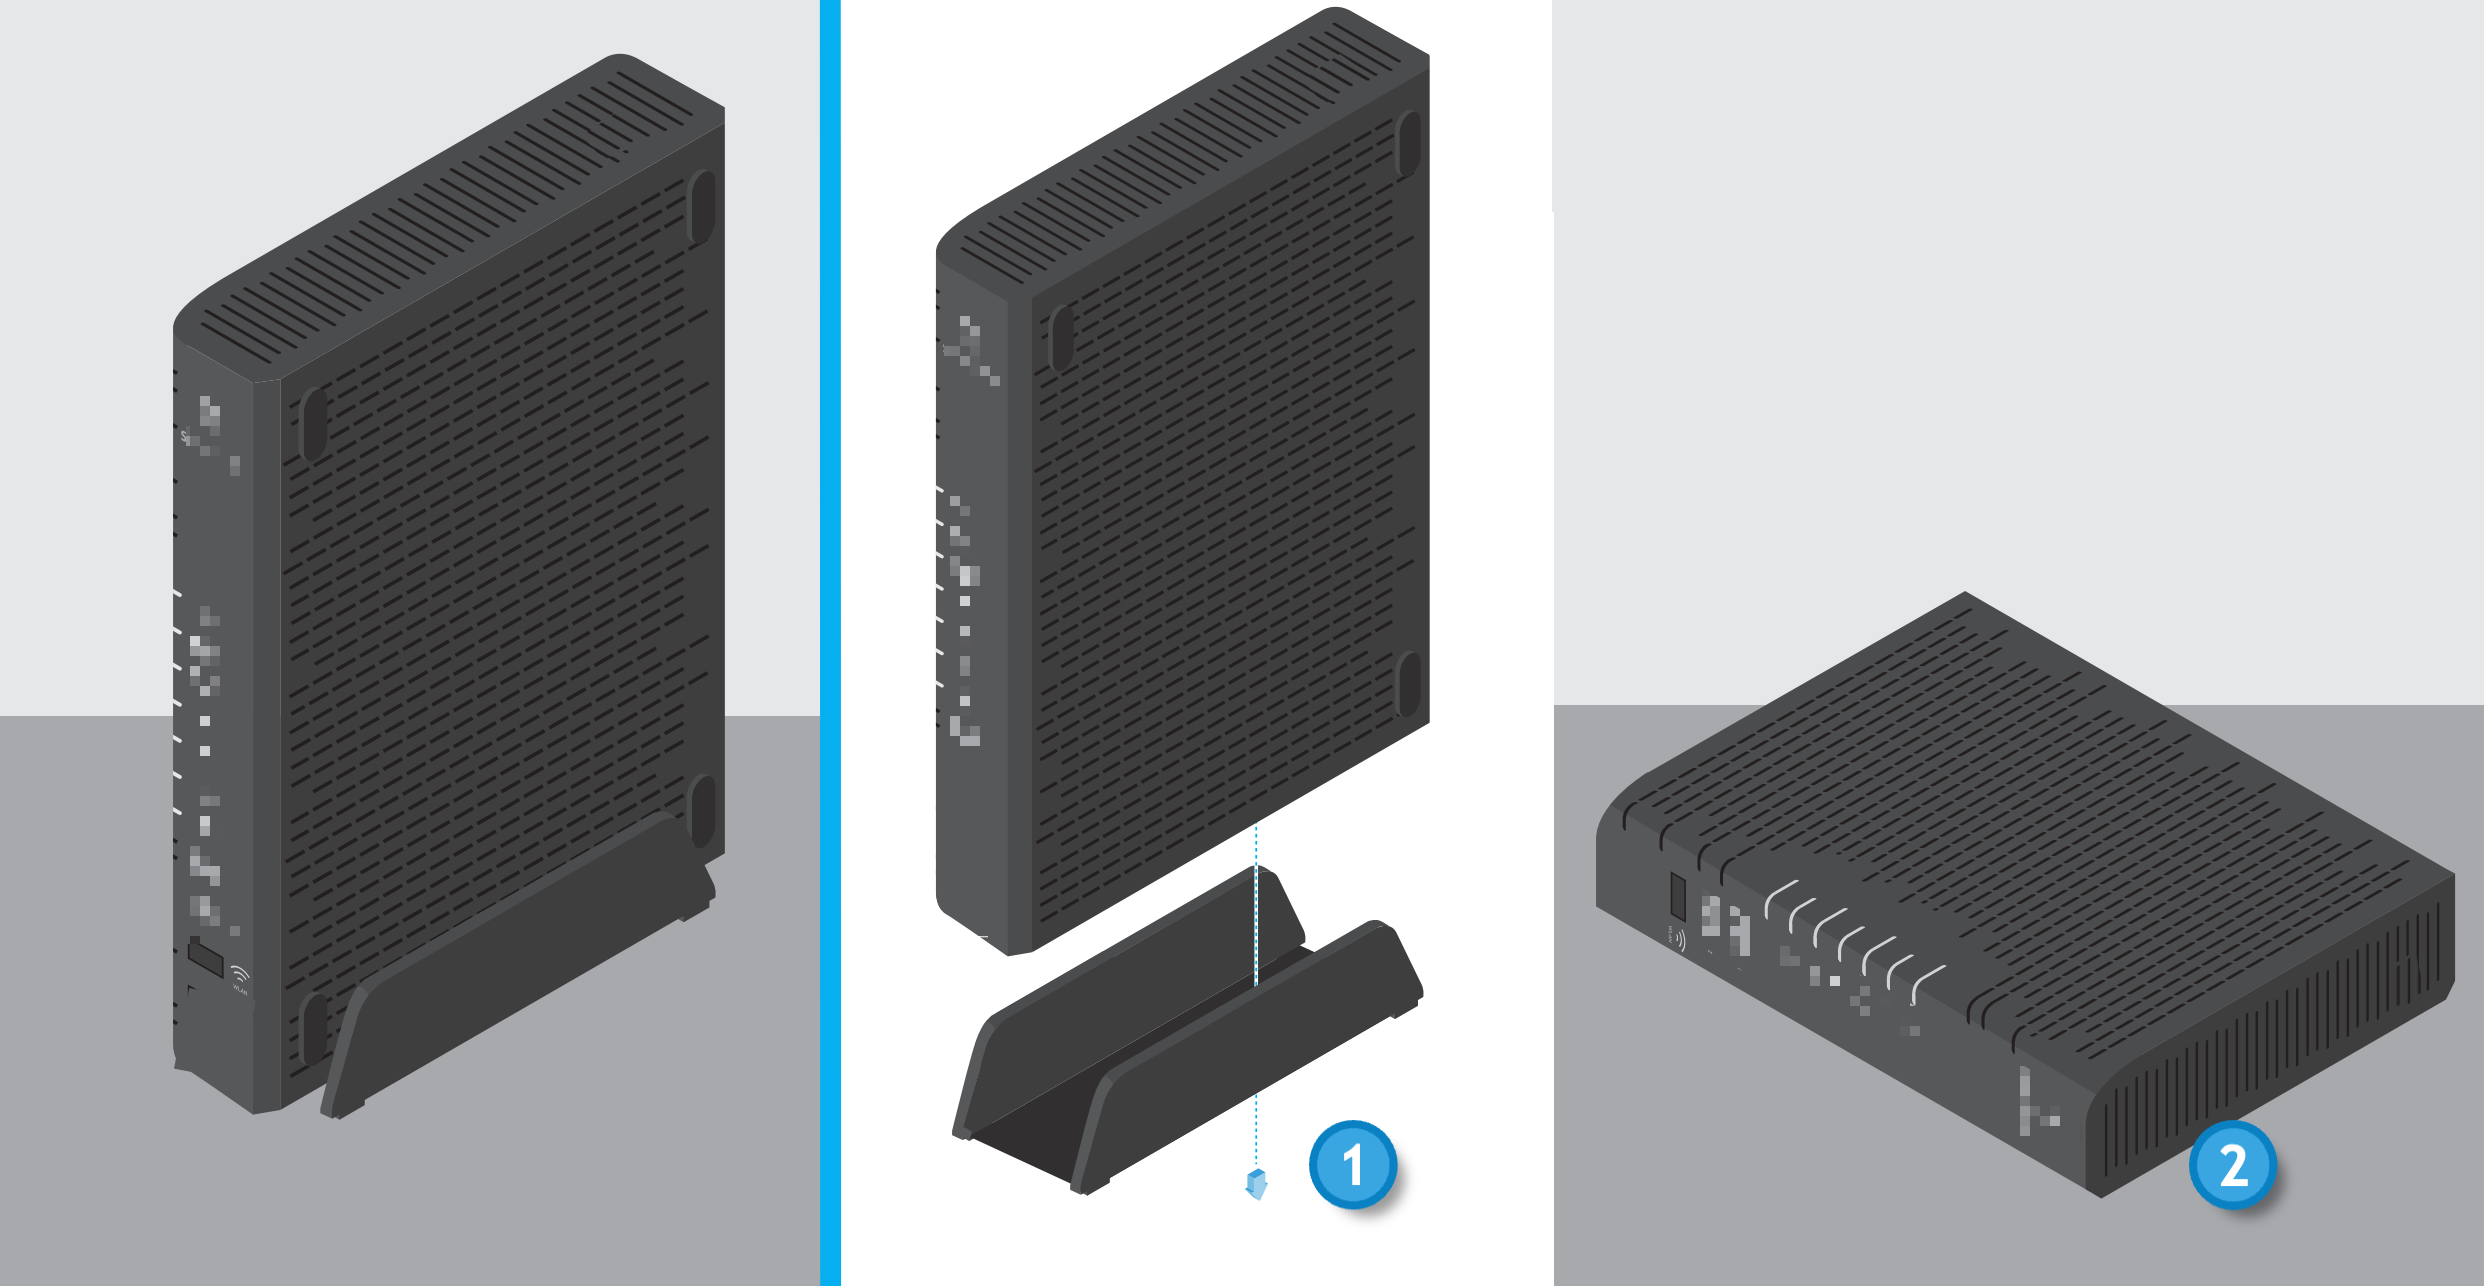
Wall mounting

19-inch rack
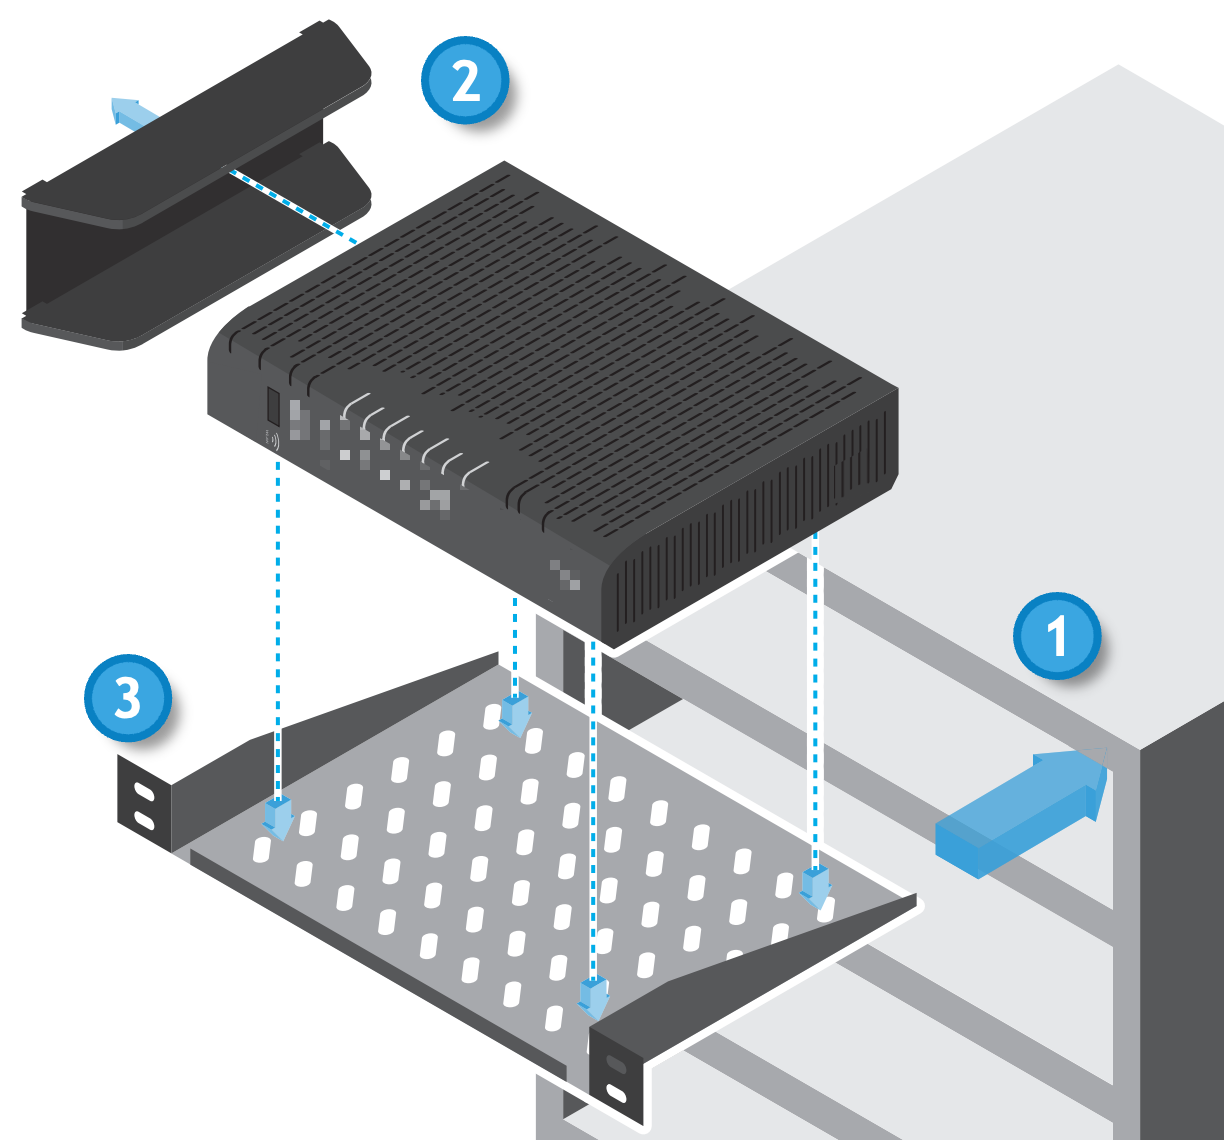 With this installation in the IT rack, the Wi-Fi signal strength can be negatively affected. If necessary, the Wi-Fi can be expanded with one or more Business WLAN-Boxes (see ["Everything about the Business WLAN-Box"]../wlan/mesh)).
Where are the previous PDF installation instructions located?


Are you missing something here? Give us feedback!
Help us improve the CB-Guide. Let us know what content you are missing or how we can improve.
Send feedback